The art of painting clothing: Understanding and rendering fabric folds

Last Updated on 3 December, 2025 by Armored Pencil
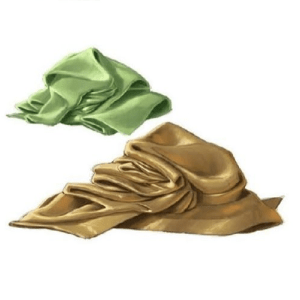
Painting fabric folds is a crucial skill for artists aiming to bring realism and dynamism to their artwork. Understanding how fabric behaves and how to accurately render its folds can transform a flat, lifeless painting into a dynamic, three-dimensional masterpiece. This guide will walk you through the seven types of fabric folds. Helping you master the techniques needed to paint clothing with confidence and precision.
Mastering the art of painting fabric folds can elevate your artwork, making it more engaging and realistic. Whether you’re painting portraits, figures, or still life, the ability to render fabric folds convincingly is essential. In this blog post, we will explore the seven types of folds: pipe folds, zigzag folds, spiral folds, half-lock folds, diaper folds, drop folds, and inert folds. Each type has its unique characteristics and understanding them will help you capture the essence of fabric in your paintings.
If you are just looking for references have a look on References for Fabrics, Drapery, Folds, Textures and what not!
Understanding Fabric Folds
Fabric folds are created by the way fabric drapes and interacts with the underlying form. Understanding why fabric folds and how it behaves in real life is the first step in rendering it convincingly. Fabric folds are influenced by factors such as the weight and stiffness of the fabric, the movement of the figure or object beneath it, and the force of gravity.
Observing real-life fabric is essential for understanding its behavior. Pay attention to how fabric drapes over different forms, how it stretches and compresses, and how it creates shadows and highlights. Take the time to sketch fabric from life, noting the various types of folds and how they interact with each other. This practice will deepen your understanding and improve your ability to render fabric folds accurately in your paintings.
The Seven Types of Folds
Mastering the art of painting fabric folds involves understanding the unique characteristics of each type of fold. Here, we explore seven distinct types of folds and provide guidance on how to paint them effectively.
1. Pipe Folds
Description: Pipe folds occur when fabric is compressed or bunched together, creating folds that resemble pipes or cylinders. These folds are often seen in areas where fabric is gathered or squeezed, such as around elbows or knees.

How to Paint:
- Step-by-Step Guide:
- Sketch the Basic Shape: Begin by lightly sketching the basic shape of the pipe folds. Pay attention to the direction and flow of the folds.
- Define the Shadows: Identify the light source in your painting and determine where the shadows will fall. Use a darker shade of your base color to paint the shadowed areas of the folds.
- Add Highlights: Use a lighter shade or a touch of white to add highlights to the areas of the folds that catch the light. This will create a sense of depth and three-dimensionality.
- Blend and Refine: Use a blending brush to soften the transitions between the shadows and highlights. Refine the details to capture the subtle variations in the fabric.
- Tips on Shading and Highlighting: To create a three-dimensional effect, focus on the contrast between the shadows and highlights. Use a variety of brush strokes to capture the texture of the fabric, and don’t be afraid to layer your paints to build up the desired effect.
2. Zigzag Folds
Description: Zigzag folds occur when fabric is pulled tightly between two points, creating a series of sharp, angular folds that resemble a zigzag pattern. These folds are commonly seen in areas where fabric is stretched or tensioned, such as across the shoulders or back.

How to Paint:
- Techniques for Capturing Sharp Angles and Tension:
- Outline the Folds: Start by outlining the basic shape of the zigzag folds. Use quick, confident strokes to capture the sharp angles and tension in the fabric.
- Define the Shadows and Highlights: Determine the light source and use a darker shade to paint the shadowed areas of the folds. Use a lighter shade or white to add highlights to the areas that catch the light.
- Emphasize the Angles: Use crisp, clean brush strokes to emphasize the sharp angles of the zigzag folds. Pay attention to the direction and flow of the folds, and use your brush strokes to enhance the sense of tension in the fabric.
- Examples of Where Zigzag Folds Commonly Appear: Zigzag folds are often seen in clothing that is pulled tightly across the body, such as fitted jackets, dresses, or tops. They can also appear in areas where fabric is gathered or pleated, such as in skirts or pants.
3. Spiral Folds
Description: Spiral folds occur when fabric wraps around a cylindrical form, creating a smooth, continuous pattern that spirals around the object. These folds are often seen in areas where fabric is wrapped or twisted, such as in sleeves or draped fabric.

How to Paint:
- Methods for Painting the Smooth, Continuous Flow:
- Sketch the Basic Shape: Begin by lightly sketching the basic shape of the spiral folds. Pay attention to the direction and flow of the folds, and use smooth, continuous lines to capture the spiral pattern.
- Define the Shadows and Highlights: Determine the light source and use a darker shade to paint the shadowed areas of the folds. Use a lighter shade or white to add highlights to the areas that catch the light.
- Blend and Refine: Use a blending brush to soften the transitions between the shadows and highlights. Refine the details to capture the smooth, continuous flow of the spiral folds.
- Tips on Maintaining Consistency: To maintain consistency in the spiral pattern, focus on the overall flow and direction of the folds. Use a variety of brush strokes to capture the texture of the fabric, and don’t be afraid to layer your paints to build up the desired effect. Pay attention to the subtle variations in the fabric, and use your brush strokes to enhance the sense of depth and three-dimensionality.
4. Half-Lock Folds
Description: Half-lock folds occur when fabric is pulled and partially locked in place, creating a series of interlocking folds that add complexity and texture to the fabric. These folds are often seen in areas where fabric is gathered or draped, such as in skirts, curtains, or draped clothing.

How to Paint:
- Instructions on Painting the Interlocking Nature:
- Sketch the Basic Shape: Begin by lightly sketching the basic shape of the half-lock folds. Pay attention to the interlocking pattern and the areas where the fabric is pulled and locked.
- Define the Shadows: Use a darker shade of your base color to paint the shadowed areas of the folds. Focus on the areas where the fabric overlaps and interlocks, creating depth and complexity.
- Add Highlights: Use a lighter shade or a touch of white to add highlights to the areas that catch the light. This will enhance the three-dimensional effect and bring out the interlocking nature of the folds.
- Blend and Refine: Use a blending brush to soften the transitions between the shadows and highlights. Refine the details to capture the subtle variations in the fabric and the complexity of the interlocking folds.
- Techniques for Creating Depth and Realism: To create depth and realism, focus on the contrast between the shadows and highlights. Use a variety of brush strokes to capture the texture of the fabric, and layer your paints to build up the desired effect. Pay attention to the overall flow and direction of the folds, and use your brush strokes to enhance the sense of depth and three-dimensionality.
5. Diaper Folds
Description: Diaper folds create a pattern of intersecting lines, often seen in draped fabric that is gathered or folded in a rhythmic pattern. These folds add a sense of order and symmetry to the fabric, and are commonly seen in draped clothing, curtains, and tablecloths.

How to Paint:
- Guide on Painting the Intricate Patterns:
- Sketch the Basic Shape: Begin by lightly sketching the basic shape of the diaper folds. Pay attention to the pattern of intersecting lines and the overall symmetry of the design.
- Define the Shadows: Use a darker shade of your base color to paint the shadowed areas of the folds. Focus on the areas where the fabric overlaps and intersects, creating a sense of depth and complexity.
- Add Highlights: Use a lighter shade or a touch of white to add highlights to the areas that catch the light. This will enhance the three-dimensional effect and bring out the intricate patterns of the folds.
- Blend and Refine: Use a blending brush to soften the transitions between the shadows and highlights. Refine the details to capture the subtle variations in the fabric and the symmetry of the diaper folds.
- Tips on Maintaining Symmetry and Balance: To maintain symmetry and balance in the design, focus on the overall pattern and rhythm of the folds. Use a variety of brush strokes to capture the texture of the fabric, and layer your paints to build up the desired effect. Pay attention to the subtle variations in the fabric, and use your brush strokes to enhance the sense of order and symmetry.
6. Drop Folds
Description: Drop folds occur when fabric hangs down from a fixed point, creating a drooping effect that adds a sense of weight and movement to the fabric. These folds are often seen in areas where fabric is draped or hanging, such as in curtains, draped clothing, or tablecloths.

How to Paint:
- Steps for Capturing the Weight and Flow:
- Sketch the Basic Shape: Begin by lightly sketching the basic shape of the drop folds. Pay attention to the direction and flow of the folds, and the areas where the fabric droops and hangs.
- Define the Shadows: Use a darker shade of your base color to paint the shadowed areas of the folds. Focus on the areas where the fabric overlaps and droops, creating a sense of weight and depth.
- Add Highlights: Use a lighter shade or a touch of white to add highlights to the areas that catch the light. This will enhance the three-dimensional effect and bring out the weight and flow of the folds.
- Blend and Refine: Use a blending brush to soften the transitions between the shadows and highlights. Refine the details to capture the subtle variations in the fabric and the drooping effect of the folds.
- Techniques for Shading to Emphasize the Drooping Effect: To emphasize the drooping effect, focus on the contrast between the shadows and highlights. Use a variety of brush strokes to capture the texture of the fabric, and layer your paints to build up the desired effect. Pay attention to the overall flow and direction of the folds, and use your brush strokes to enhance the sense of weight and movement.
7. Inert Folds
Description: Inert folds occur when fabric is at rest, creating soft, natural folds that add a sense of realism and relaxation to the fabric. These folds are often seen in areas where fabric is draped or hanging loosely, such as in draped clothing, curtains, or bedding.
How to Paint:
- Methods for Painting the Subtle, Natural Appearance:
- Sketch the Basic Shape: Begin by lightly sketching the basic shape of the inert folds. Pay attention to the soft, natural flow of the folds, and the areas where the fabric drapes and hangs loosely.
- Define the Shadows: Use a darker shade of your base color to paint the shadowed areas of the folds. Focus on the areas where the fabric overlaps and drapes, creating a sense of depth and realism.
- Add Highlights: Use a lighter shade or a touch of white to add highlights to the areas that catch the light. This will enhance the three-dimensional effect and bring out the soft, natural appearance of the folds.
- Blend and Refine: Use a blending brush to soften the transitions between the shadows and highlights. Refine the details to capture the subtle variations in the fabric and the relaxed look of the folds.
- Tips on Creating a Realistic, Relaxed Look: To create a realistic, relaxed look, focus on the overall flow and direction of the folds. Use a variety of brush strokes to capture the texture of the fabric. And layer your paints to build up the desired effect. Pay attention to the subtle variations in the fabric, and use your brush strokes to enhance the sense of realism and relaxation.
Here are two YouTube videos from Marc Brunet and Marco Bucci explaining and showing in detail how to create these type of folds.
Practical Exercises
To master the art of painting fabric folds, it’s essential to practice each type of fold and observe how fabric behaves in real life. Here are some practical exercises to help you improve your skills:
Pipe Folds:
Drape a piece of fabric over a cylindrical object, such as a rolled-up towel or a vase. Observe how the fabric compresses and creates pipe-like folds. Sketch the folds, paying attention to the shadows and highlights, and then paint them using the techniques described earlier.
Zigzag Folds:
Stretch a piece of fabric tightly between two points, such as the back of a chair or a clothesline. Observe how the fabric creates sharp, angular folds. Sketch the folds, focusing on the tension and angles, and then paint them using the techniques described earlier.
Spiral Folds:
Wrap a piece of fabric around a cylindrical object, such as a bottle or a rolling pin. Observe how the fabric creates a smooth, continuous spiral pattern. Sketch the folds, paying attention to the flow and direction, and then paint them using the techniques described earlier.
Half-Lock Folds:
Gather a piece of fabric and partially lock it in place, creating a series of interlocking folds. Observe how the fabric overlaps and interlocks, creating depth and complexity. Sketch the folds, focusing on the interlocking nature, and then paint them using the techniques described earlier.
Diaper Folds:
Drape a piece of fabric over a flat surface, such as a table or a chair, and gather it in a rhythmic pattern. Observe how the fabric creates a pattern of intersecting lines, adding symmetry and balance to the design. Sketch the folds, paying attention to the overall pattern, and then paint them using the techniques described earlier.
Drop Folds:
Hang a piece of fabric from a fixed point, such as a clothesline or a curtain rod. Observe how the fabric droops and creates a sense of weight and movement. Sketch the folds, focusing on the weight and flow, and then paint them using the techniques described earlier.
Inert Folds:
Drape a piece of fabric over a flat surface, such as a table or a chair, and let it hang loosely. Observe how the fabric creates soft, natural folds, adding a sense of realism and relaxation to the design. Sketch the folds, paying attention to the soft, natural appearance, and then paint them using the techniques described earlier.
Tips on Observing and Sketching Fabric Folds:
To improve your observation and sketching skills, take the time to study fabric folds from real life or reference images. Pay attention to the direction and flow of the folds, the areas of shadow and highlight, and the overall texture and weight of the fabric. Use a variety of sketching techniques, such as contour drawing, gesture drawing, and shading, to capture the essence of the fabric folds.
Common Mistakes and How to Avoid Them
When painting fabric folds, it’s easy to make mistakes that can detract from the realism and dynamism of your artwork. Here are some common mistakes and practical advice on how to avoid them:
- Lack of Contrast: One of the most common mistakes is not using enough contrast between the shadows and highlights. This can result in flat, lifeless fabric folds that lack depth and three-dimensionality. To avoid this mistake, focus on the contrast between the shadows and highlights, and use a variety of brush strokes to capture the texture of the fabric.
- Incorrect Fold Direction: Another common mistake is painting the folds in the wrong direction, which can disrupt the overall flow and movement of the fabric. To avoid this mistake, take the time to observe the direction and flow of the folds. Use your brush strokes to enhance the sense of movement and dynamism.
- Overblending: Overblending the shadows and highlights can result in a loss of detail and texture in the fabric folds. To avoid this mistake, use a blending brush sparingly, and focus on capturing the subtle variations in the fabric.
- Ignoring the Light Source: Ignoring the light source can result in inconsistent shadows and highlights, which can detract from the realism of the fabric folds. To avoid this mistake, always determine the light source before you begin painting, and use it to guide your shadows and highlights.
- Lack of Practice: Finally, a lack of practice can result in stiff, unrealistic fabric folds that lack the subtle variations and complexity of real fabric. To avoid this mistake, take the time to practice and experiment with different techniques, and don’t be afraid to make mistakes and learn from them.
Conclusion
Understanding and mastering fabric folds is an essential skill for artists aiming to bring realism and dynamism to their artwork. By studying the seven types of folds and practicing the techniques described in this guide, you can elevate your paintings and capture the essence of fabric in your artwork.
Remember, the key to mastering fabric folds is practice and experimentation. Don’t be afraid to make mistakes and learn from them, and always strive to improve your observation and sketching skills. With time and dedication, you can become a master of painting fabric folds and create artwork that is both engaging and realistic.
We invite you to share your artwork and progress with us, and we look forward to seeing the incredible fabric folds you create!
Additional Resources
To further enhance your understanding and mastery of fabric folds, here are some recommendations for further reading, tutorials, and online courses:
- Books:
- “Figure Drawing: Design and Invention” by Michael Hampton
- “The Artist’s Guide to Drawing the Clothed Figure” by Michael Massen
- “Classic Human Anatomy: The Artist’s Guide to Form, Function, and Movement” by Valerie L. Winslow
- Online Courses:
- “The Art of Painting Fabric Folds” on Udemy
- “Mastering Fabric Folds in Oil Painting” on Skillshare
- “Drawing and Painting Fabric Folds” on Domestika
- Reference Images and Videos:
- Pinterest boards dedicated to fabric folds and drapery
- YouTube tutorials on painting fabric folds, such as those by Proko and Draw Mix Paint
- Online galleries and museums, such as the Metropolitan Museum of Art and the Louvre, which offer high-resolution images of artwork featuring fabric folds
All fold examples are from this pinterest post.
Ready to get painting, have a look at these references.
References for Fabrics, Drapery & Folds

You can find all sorts or References for Fabrics, Drapery & Folds packs on this page.
Drawing References for beginners

Here you will find a collection of Drawing References for beginners packs
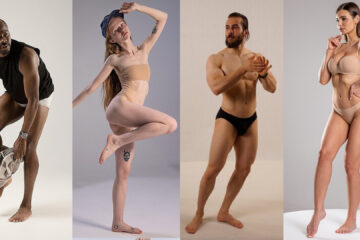
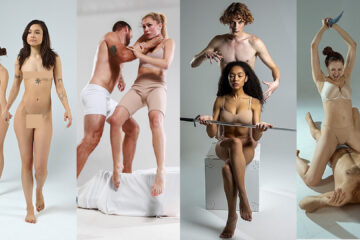
Couple Pose References

Of course you will need Males and Females together in your paintings. Couple Pose References just a click away!

1 Comment
Free Nano Banana · 24 September, 2025 at 01:02
This guide is incredibly helpful for artists wanting to master fabric folds! The detailed steps and exercises are practical and easy to follow, making it easier to add realism to paintings.